

Learn How To Draw
- China Jordan
- May 14, 2025
- 6 min read

This is quite a big statement, How do I 'learn how to draw?'. It's something people ask me all the time, and the answer can be simple, or it can be complex, depending on who you ask! Over the past 6 years of teaching people how to draw, I've had to re-learn it myself so I can show others what it takes to learn how to draw through a different lens. I've been drawing for over 30 years, and I'm not good because I've got all of these years behind me (although it does help). I'm good because I wanted it. I wanted nothing more than to learn how to draw, and I made it my mission to figure it out. Let me show you what I learnt.
In this blog, I'm going to show you some tools so that you can play around with, to help you learn how to draw too and what you should be practising. Here are my top 8 topics you should master when learning how to draw:
Grid Method
Negative Space
Shading
Shadows
Line Direction
Proportions
Abstract Shapes
Plumb Lines
Grid Method
The grid method is perfect for beginners. If you've never picked up a pencil before or drawn anything in your life, then this is where you should start. The premise is that you have a reference picture which has a grid placed on top of it. This breaks the image down into bite-sized chunks and stops us from guessing the lines we're drawing, and instead, helps us to see the lines much more clearly than if we had to draw the full image. Here, I've given you an example which you can try at home. The aim of the grid is not to depend on it, but to help you get off the starting blocks and show you that you can draw! If you want to see a video demo, feel free to watch the video series here.

Negative Space
Negative space is one of the most useful techniques I learnt as it teaches how to see things in a different light. It's not just about the object that you draw. But it's also about the object that you don't draw. We need to be able to see the dead space around an object to give us another opportunity to see the shape. This is particularly useful if you are struggling with a shape, as it could be quite complex. Instead, we can use negative space, such as backgrounds and foregrounds, to draw the space around and to help us complete challenging areas. See if you can draw this chair below using the negative space only.

Shading
You cannot miss this lesson. Shading is a whole series of events. How to shade, how to hold youre pencil, should you or shouldn't you smudge? (For me, that's a hard no). First of all, get to know your pencils. A lot of teachers will tell you you should use this, and you shouldn't use that, but I don't believe that one size fits all. Personally, I only use a 2B, 8B & 2H. These cover all your needs for dark lines, sharp lines, and light lines. Not everyone will agree, but you'll find all my lessons stick to this.
Next, you need to learn the different shades. Can you get at least 10 shades in all your pencils? Focus on getting even squares and different shades. Next, try gradients, followed by blending edges. This is pretty much all you need!
Finally, which shading technique is for me? You can shade traditionally, in a cross hatch, using scribbles, pointelism or event directional lines. Below are some video exercises that you can practise at home to improve you shading techniques and see what you enjoy the most:
5 Different Ways to shade

Check Out My Youtube Channel Value / Shading Scale Exercises
https://youtu.be/9zEALt5L9FY https://youtu.be/V-jXBTsiGpg

Value Scale Exercise
Shadows
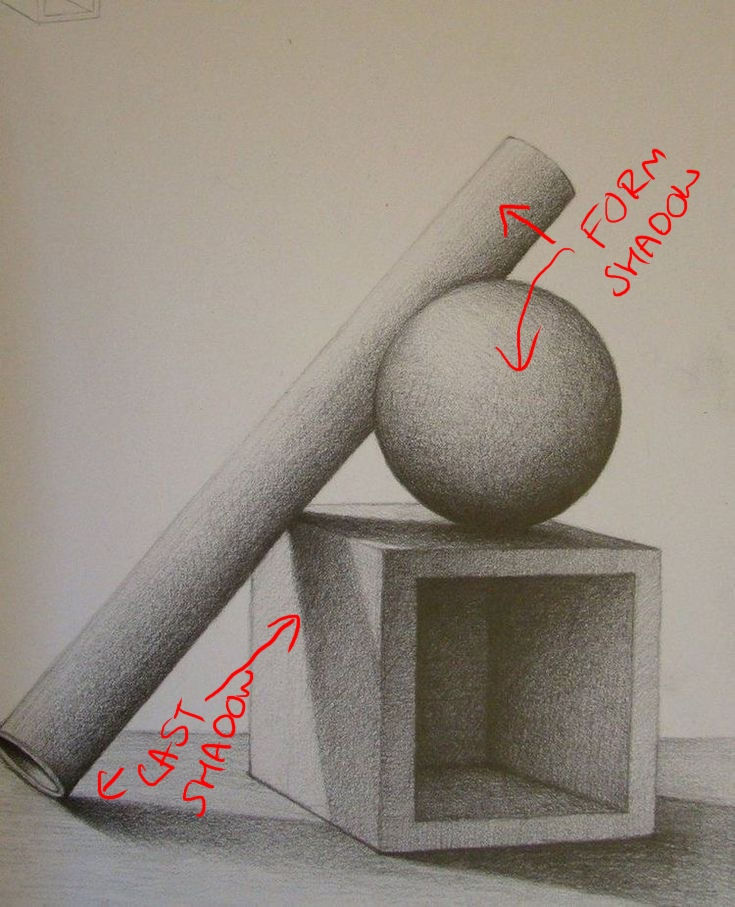
It's helpful to know the difference between a form shadow and a cast shadow. This helps when drawing, so you can hit the dark tones early on and improve your shading confidence. It also reminds you when to blend something into a gradient because you'll see it on a form shading, for example. The difference between a form and a cast shadow is quite simple. Ask yourself, is the shadow formed on my shape because the light can no longer reach it, or is the shadow being cast by the object? Imagine you are walking down a street and the sun is behind you ... There is a shadow being cast onto the floor from your body shape. This is a cast shadow. Now you look down at your body, and your front body is in shadow, but your back body is in light as the sun is touching your back but not your front. This is created because the form is stopping light from creeping around the front. This is your form shadow.
Line direction
This one is important. Sometimes we pay no attention to the lines at all, and to which way they are going. There are a few ways we can read lines to make sure we are on the right track... Options: a. Ask yourself, (if vertical) is my line going straight, to the right, or to the left - this will help you to make sure it's at least going in the right line. The same for horizontally. Is the line flat, going up, or going down? This often corrects huge mistakes really easily.
b. Can you assign a time to the line you are looking at drawing? For example, there's a big difference between 4:30 pm and 4:40 pm, so reading a line for its minutes rather than just the hours can help you draw it on your page. As you draw your line, you can then read that as a new line and see if it matches up to the reference picture. It takes some getting used to, but it helps you assign a number to an abstract concept.

Proportions
We could spend hours on this concept - proportions. You probably see artists measure with one eye closed all the time, and this is particularly popular in life drawing. For example, you ask yourself, how many heads can fit inside the body? You can take a measurement from any aspect of an image and compare the size to other spaces on the page. You just need to decide whether you are copying the drawing sight-sized (where it's exactly the same size as the reference) or comparative size (where you draw either bigger or smaller than the original)

Abstract shapes
Learning how to see abstract shapes in the everyday will help you to get one step closer to realism. Our brain is always sabotaging what we think we can see, so it makes up certain shapes and line directions to take a shortcut to the end result. What we need to do is train our eye to see an abstract shapes, rather than a shape of a cast shadow for a vase for example, we may end up just drawing a vase on the floor rather than the abstract shape that it is. Here's an example below of how to break down an object into abstract shapes and draw the image without drawing the image (if that makes sesnse). Try and draw the abstract shapes of the shadows in the right places so that when you draw the rest of the shape, the pieces should come together.

Plumb Lines
Last but not least, the yee old technique of using plumb lines is a magical yet simple technique to help check your negative spaces, your line directions or just make sure your drawing is going in the right direction in general! Plumb lines originate from pieces of string in the studio, and plumb or small weights would be attached to the bottom to make sure the lines were straight. People could then use these as a reference point from one part of the object and check the negative space between the line and the object. You can do the same with your pencil, hold it up next to the object in a straight line, I often close one eye and look and what the information is telling you. Am I leaving enough space? Is the line in the right direction? Is it connecting to something else further on?

After reading all this, you may be thinking - 'CRICKEY'! But I hope you're also thinking, 'Great, I can't wait to learn!'. Drawing is a journey, and that's super cheesy, but it is. You'll be able to see progress from day one. Draw yourself a portrait before you even consider any of these lessons to see where you're at. And then, practise, focus on 1 goal each time, and you can draw another portrait in weeks or months to come and see how far you've progressed.
Please feel free to reach out and ask me any questions! I offer 1-1 lessons and I"m happy to give the odd bit of feedback to you for free.
Happy drawing folks!


Comments